The support role in League of Legends can often be a thankless job. A good support can go relatively unnoticed during the game, but playing poorly can get you ruthlessly flamed.
The types of supports in League can be split into three categories: Enchanters, engagers, and poke supports. While some champions cross over into multiple categories, it’s a pretty safe golden triangle to go by.
Enchanter supports, like Soraka or Nami, focus on keeping the bot lane carry alive through the laning phase with heals and shields. Enchanter supports usually go well into poke supports because they can out-sustain the poke, but struggle into engagers due to a lack of mobility and relative squishiness.
Engage supports, like Alistar or Leona, look to all-in the enemy bot lane during the laning phase with crowd control and high early-game damage. They can capitalize on enchanters during the laning phase because of their lack of poke, but can’t deal with poke supports effectively since they whittle down your health before you can even think about engaging.
Poke supports, like Zyra or Brand, succeed by annoying the enemy laners as much as possible with long-range abilities, forcing them to waste their potions or heals. If an enemy gets greedy, they also have a fair amount of burst in their kits to delete them from Summoner’s Rift. Because of this, they can deal with engage supports. But enchanters can usually out-sustain a poke support’s mana pool, rendering their poke ineffective.
With this in mind, let’s break down the best supports for League’s Patch 13.18.
Thresh

Pros
- The most versatile support
- Great engage potential
- Can reposition allies with lantern
Cons
- Squishy early on
- Struggles from behind
Regardless of the meta, Thresh is always able to find himself a spot among the top supports. He might not be the No. 1 pick but he’s a consistent pick that can be played in nearly all matchups. His versatile kit and the tools he offers to the table are every ADC’s wet dream. His win rate is not sensational, but he recorded over 15 percent pick rate at Emerald and above, according to U.GG. If you’re not sure what champion to play this meta, you can always rely on him.
Item build

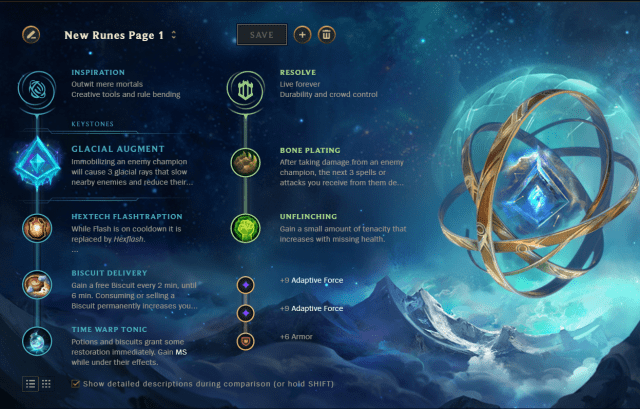
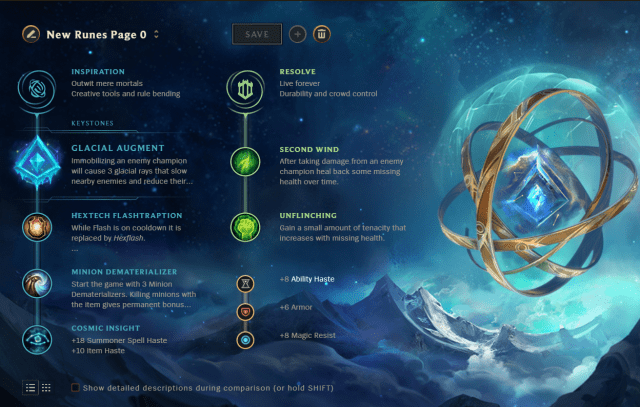
The main keystone rune for Thresh is now Glacial Augment instead of Aftershock. This is because the slow effect makes it easier to stick to the enemies during skirmishes. Even if they Flash or try to dash away, the slow will be enough to keep the chase going. While Thresh does lose a few resistances, Aftershock doesn’t offer the same reliability as Glacial Augment.
Perfect Timing, Biscuit Delivery, and Cosmic Insight are the minor runes of the Inspiration tree. You can swap out Biscuit Delivery for Minion Dematerializer if you want to play with the minion wave and make unexpected engages.
For the secondary tree, go for Resolve and choose Bone Plating and Unflinching. The first allows you to tank more damage during trades, while Unflinching grants extra tenacity. The latter is valuable for teamfights and skirmishes later into the game.
Build-wise, you usually want to build Locket of the Iron Solari as the main Mythic item. Since you will be in the middle of the mix most of the time, the active shield can be a great way to neutralize part of the enemy’s damage while also protecting your allies. High Elo players prefer Shurelya’s Battlesong, as the extra movement speed bonus can be better for dodging spells, chasing, or running away from enemies.
There are two different build paths to consider. You can either decide to rush Zeke’s Convergence for additional damage or Knight’s Vow for a more supportive build and tank the damage for your carry. Choose the order based on the game state, but you’ll likely build them both. For the final item slots, pick up Watchful Wardstone and Redemption to have an AoE healing during skirmishes and teamfights.
Ability priority
After the buffs to the spells, Thresh should now go for R>Q>E>W. His Q, Death Sentence, has a low cooldown once Thresh builds enough ability haste, allowing him to apply multiple crowd controls in quick succession. After that, max E, Flay. second for the additional damage. Given that the balance team lowered the lantern’s cooldown, it’s fine to max it last.
Game plan
The laning phase is highly dependent on the matchup, which is what makes Thresh hard to master. While learning everything takes time, the main guideline is to try using your ranged auto attacks to harass the enemy laners in the middle of the minion waves and then look to get small trades with your hook or Flay. If you have a bully ADC early on, like Caitlyn or Draven, trade more aggressively. Otherwise, sit back and try to punish enemies when they overstep. You have a great setup for tanks, so waiting for the jungler is also a good idea.
Once you get some item components, you can also start to roam around the map after recalls. It’s something that high Elo players often do to impact other lanes, especially when bot laners end up farming only. Make the enemies feel your presence and use it to your advantage.
Later into the game, play with the vision control and look for potential picks in bushes or fog of war. If you manage to hook the right carry, go all in with your combo and let your carries do the job. Avoid walking forward too much since you’re vulnerable to getting caught; unless you have Flash, you won’t be able to get away.
Alistar

Pros
- Great diver and hard-engager
- Tankier than most supports
- Has decent peeling potential with his crowd controls
Cons
- Can be heavily punished during the laning phase
- His engages can be easy to predict
Compared to all other engage supports, Alistar has one great strength that allows him to stay relevant for longer in the game: his ultimate. Thanks to the damage reduction over the ultimate duration, Alistar can cleanse effects and survive long enough to cast multiple instances of his own spells.
On top of that, the cow shares good synergy with some of the strongest ADCs of the patch, such as Ezreal, Samira, and Kai’Sa. With a positive win rate and an impressive 9 percent pick rate at Diamond Elo and above (according to U.GG), Alistar is a champion you should be considering in this meta.
Item build

Just like most supports, Alistar runs Glacial Augment as his main keystone rune. Since Aftershock is not as reliable, the slow from Glacial Augments helps to stick to the enemies and apply the stun with Alistar’s E.
The minor runes from the Inspiration tree are Hextech Flashtraption, Minion Dematerializer, and Cosmic Insight. In particular, Minion Dematerializer is key because it helps Alistar farm minions from a distance without having to walk into melee range to last hit them.
Most Alistar players like running Resolve as the secondary tree by going Bone Plating and Unflinching. Some of them, however, can also run Nimbus Cloak and Waterwalking, especially if their focus is to roam around the map rather than fighting and trading against the enemy bot lane.
Items-wise, Alistar always runs Evenshroud as his Mythic item: he has several crowd controls that will allow his teammates to deal increased damage to enemies. There are only some highly situational scenarios where Iron of the Locket Solari might be a better item, typically against burst damage-oriented team compositions.
Follow up with a Knight’s Vow to redirect some of the damage taken from your allies to yourself and Zeke’s Herald to further boost their damage output. Round off by strengthening your own resistances by getting Thornmail and Force of Nature. Vigilant Wardstone can be a great alternative to either of those when you need to close an additional legendary item before an important late-game teamfight.
Ability priority
On Alistar, the usual leveling order is R>Q>W>E. Alistar’s Q, Pulverize, is his main ability for skirmishes and engages, so it must be maxed first to increase its damage and lower its cooldown. Since the W, Headbutt, is the ability used to connect the combo with his Q, level it up second, before his E.
Game plan
Compared to other engage supports, it can be harder for Alistar to find the ideal engage to punish the enemies during the laning phase. On the other hand, though, the cow has much stronger roaming potential and can surprise enemies by coordinating with other teammates to find assists and kills on the map.
One thing you should always keep in mind is Alistar’s tower diving potential post-level six. Whether it’s in the bottom lane or elsewhere on the map, use it to your advantage to coordinate plays and punish the enemies. Well-executed dives can swing the momentum to your team quickly and allow you to get a crucial lead to accelerate the game.
In the teamfights, you should be looking to get the right timings and engage to punish mispositioned enemy carries. If you have a squishy carry that needs peeling, consider using your crowd controls to knock away the enemy threats: read the situation and choose based on the circumstances.
Blitzcrank
Pros
- One of the best hookers in the game
- Crowd control combos
- Perfect counter to enchanters and squishy supports
Cons
- Hook-reliant, misuse can backfire hard
- Immobile once W is used
In a meta dictated by squishy champions like Xerath, Blitzcrank is one of the best counters to gain an edge both during the laning phase and in the fights. His hooks are perfect at punishing those champions’ lack of mobility and shutting them down before they can do anything. As long as you’re good at predicting movements and landing abilities, you’ll have a wonderful time playing Blitzcrank.
Item build
Blitzcrank’s main keystone rune is Glacial Augment. It’s the most effective rune when it comes to locking down single targets. Paired with the champion’s grab, as well as Power Fist (E), any hooked target won’t have the chance to get away. Alternatively, you can also consider going for Aftershock for more resistances. That said, it’s not as reliable, so pick it situationally.
For the minor runes of the Inspiration tree, choose Hextech Flashtraption, Biscuit Delivery, and Time Warp Tonic. While the first one is standard and allows you to make unexpected Flash hooks over walls or bushes, the other two are situational and can be swapped for other runes. In particular, if you’re not looking to play aggressively, you can swap out Biscuit Delivery for Minion Dematerializer: you can use it to farm cannon minions from a distance or catch people off guard by hooking the enemies sitting behind the minion. While Time Warp Tonic is a lane-oriented rune for aggressive trading, you can change it to Cosmic Insight for lower cooldowns on your items and Summoner spells.
Go for Resolve as the secondary rune tree with Bone Plating and Unflinching. The first lowers incoming damage from enemies during the skirmishes, while Unflinching grants you more tenacity to reduce the crowd control duration. If enemies don’t have much crowd control, you can opt for Overgrowth instead for more tankiness.
Build-wise, most players build Shurelya’s Battlesong. Not only does it grant everything Blitzcrank would want in terms of stats, but it also gives him the active effect of increasing his team’s movement speed. Whether it’s to escape or chase enemies down, it’s the most effective Mythic item on him.
After that, there are a couple of choices that you can go for, depending on the game. The most common second item is Knight’s Vow, which redirects the damage taken from the chosen ally to you. In a meta dominated by ADCs, this is the No. 1 item to peel them. Aside from that, you can go for Frozen Heart against heavy attack damage team comps or Redemption to take advantage of the AoE healing effect. Zeke’s Convergence, Watchful Wardstone, and Mikael’s Blessing are the remaining items that you can get to round off the build.
Ability priority
On Blitzcrank, the usual leveling order is R>Q>W>E. Blitzcrank’s Q, Rocket Grab, is his iconic ability and must be maxed first for increased damage and a lower cooldown. Ever since they reworked W, Overdrive, you always want to max it a second for the boost in movement speed and attack speed. Since maxing E, Power Fist, doesn’t increase the knock-up duration, max it out for last.
Game plan
The game plan with Blitzcrank is straightforward: find hooks to punish enemy targets. Unfortunately, it’s easier said than done since Blitzcrank has to be aware of the right timing to catch people off guard: grabbing the wrong target can single-handedly lose you a game.
During the laning phase, you have to assess whether you can play aggressively against the enemy lane. Usually, this is determined by your ADCs and if he has good damage early. If yes, proceed to play aggressively. Otherwise, you can let the enemy push the wave and look to make a surprise grab by hooking an enemy onto your turret. If it lands, that will likely turn into a kill.
One thing you can do during the first few minutes is roam around the map with the goal of impacting other lanes. You can easily force Flashes by walking into the enemy’s face and picking up potential assists. Once you get to the mid-game, play with the vision control and look to hide in the fog of war to take down enemy targets. During teamfights, you can consider saving your grab to pull anyone who’s trying to assassinate your carries: analyze the situation and judge accordingly.
Senna
Pros
- Scales infinitely
- Ranged support
- Deals more damage than traditional supports
Cons
- Low mobility
- Requires great understanding of wave management
- Squishy champion
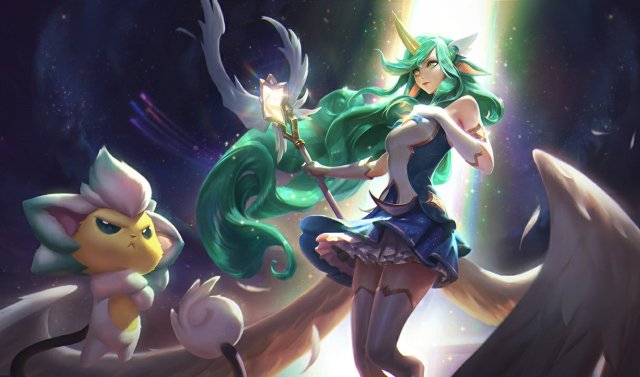
Despite the predominant presence of tanky engage supports, there is one ranged champion standing out from the rest: Senna. She has been rising in popularity, boasting impressive win rates, especially in the higher ends of the ranked ladder, according to U.GG.
Her utility and scaling make it perfect for those who are looking to carry games from the support role. Senna is basically a second marksman in every team comp she plays in, dishing out damage with her abilities and auto attacks.
Item build
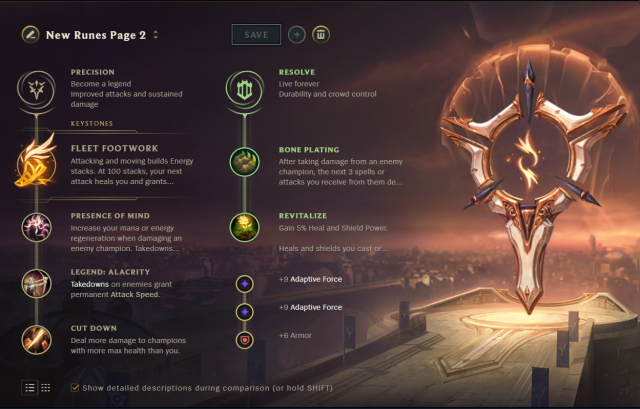
Just like most marksmen, Senna’s keystone rune is Fleet Footwork, which gives a boost of movement speed when activated and heals her. It’s an overall strong rune that works at all stages of the game, but it gains increasing power the more stats she builds later in the game.
For the remaining minor runes, you would usually go for Presence of Mind, Legend: Alacrity, and Cut Down. The first is great for getting extra mana during trades or picking up kills. Legend: Alacrity, instead, is the only viable rune from the row, and the attack speed bonus is always nice to have.
In the last row of the Precision tree, though, you can decide between Cut Down and Coup de Grace. The former is usually better since Senna is a squishy champion and will always have the bonus damage activated against tanks, but Coup de Grace is stronger when you’re snowballing hard. Choose according to the enemy team comp.
When it comes to the secondary tree, go for Boneplating and Revitalize. The latter synergizes with her healing from her Q and shield from her ultimate. Boneplating, on the other hand, is good for early-game trading and prevents Senna from getting shut down instantly in the first moments of the laning phase.
Umbral Glaive is still her core item, followed by Eclipse, Boots of Swiftness, and Rapid Firecannon. Against beefy front lines, you can swap out Rapid Firecannon for Lord Dominik’s Regard for higher damage output. Close off the build with Edge of Night and Guardian Angel to make sure you don’t get shut down at the start of a fight.
Ability priority
When playing Senna, your ability priority is R>Q>W>E. Her Q, Piercing Darkness, is the main source of damage and healing, so always max it first. After that, max Last Embrace to increase the overall damage and the root duration. Since E, Curse of the Black Mist, is a situational spell, max it last. Always take points on the ultimate Dawning Shadow whenever you can.
Game plan
Senna’s main focus throughout the game is collecting as many souls as possible. The more stacks you have, the stronger the champion becomes. That said, Senna is quite weak early on, and she can be quite vulnerable to ganks and picks on the map. Therefore, try to play safely early on without going for aggressive trades. You can farm lots of gold with your support item while also picking up souls from enemy champions. Make sure to have good vision control when pushing so you don’t get killed during ganks.
If you’re able to do the farming game consistently, you will be in a great position even if you don’t kill the enemy laners. In the mid to late-game, Senna will be essentially a secondary AD carry, greatly increasing the team’s overall damage. As long as she’s careful with her positioning, she will become a menacing presence.
Soraka
Pros
- Strongest heals in the game
- Annoying to play against
- Has a global ultimate
Cons
- Squishy and can be easily punished
- Struggles from behind
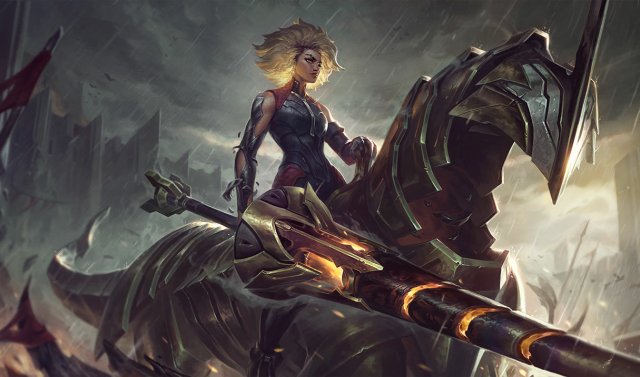
With other popular enchanters getting nerfed, Soraka is one of the few options left in this meta. If you need big heals and tools to peel your allies, she’s the right one for the job. Considering how the meta is revolved around scaling champions across every single role, Soraka comes up as great late-game insurance for every teamfight, allowing her allies to battle for much longer than usual.
On top of that, she is boasting a near-52 percent win rate, according to U.GG, with a low ban rate, meaning that she will be available to play in most of the matches.
Item build
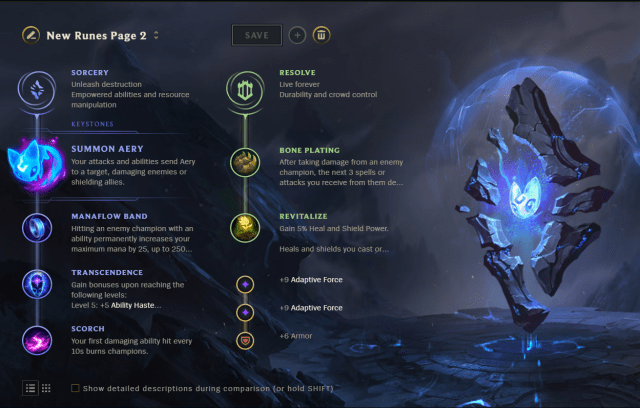
The main keystone rune for Soraka is Summon Aery. This is because the rune can function both offensively and defensively, adding either extra damage or extra shielding when casting auto attacks or abilities.
Manaflow Band, Transcendence, and Scorch are the minor runes of the Sorcery tree. You should always run this set of runes since it’s the most efficient combination, and it grants additional stats that Soraka needs.
For the secondary tree, go for Resolve and choose Bone Plating and Revitalize. The latter is an obvious choice since it amplifies the healing and shielding the allies would get, while Bone Plating will reduce the initial damage Soraka takes during a skirmish or trade.
Build-wise, you always want to build Moonstone Renewer as the main Mythic item to further increase the healing potential for your allies. It’s also a highly cost-efficient item that provides all stats Soraka wants, like Ability Haste and increased mana regeneration.
After that, you want to continue building items that have utility-based effects on your team. Redemption is usually the second item choice, followed by Ardent Censer and Staff of the Flowing Water to empower both auto attackers and spell-based champions.
A common thing Soraka players do is pick up a Warmog’s Armor as well. Thanks to the extra health, she will be harder to take down, and the item’s passive effect will quickly regenerate her health bar so she can land more without having to recall. Round off the build with a Mikael’s Blessing or Chemtech Putrifier.
Ability priority
Soraka should always go for R>W>Q>E when it comes to the ability priority order. Her W, Astral Infusion, is the only source of healing for her allies among the basic abilities. That said, you want to get Q, Starcall, at level one to apply some poke and harass at the start of the laning phase. Since her E, Equinox, is a situational spell, max it out for last.
Game plan
The laning phase will usually depend on the matchup you’re playing against, but generally speaking, Soraka is not an aggressive champion. Even though she can apply pressure with her Qs and Es, she is quite vulnerable and can be punished with one single play, especially against hook champions like Nautilus or Blitzcrank.
For that reason, look to play passively and focus on supporting your ADC with everything they need. Help them with the minion wave and heal them up if they’re losing a lot of health. Don’t get flustered if you’re falling behind: you will make up the gold gap later in the game.
Once you get to level six and start playing together during the skirmishes, that’s when Soraka’s value comes in. Her heals will prevent your allies from dying, and the enemies will struggle to win the fight if you’re constantly protecting your team. The better you get at saving your teammates, the higher the chances of victory you will have.
Rell
Pros
- Offers good engages
- Great teamfighting champion
- Destroys shields
Cons
- Can be countered during the laning phase with crowd controls
- Immobile while dismounted
- Tough to play when behind
Rell recently received a mid-scope update in Patch 13.11, which made her initially weaker. To push her up, the devs gave her some compensating buffs with a hotfix and then fine-tuned her in Patch 13.12.
In her current state, Rell is one of the best engage supports out there. Thanks to her Q which breaks shields, she counters most enchanters and meta ADCs. Her numbers are outstanding, to say the least: over 53 percent across all ranks, according to U.GG. At diamond Elo and above, the numbers go up to 55 percent in over 12,000 games. If you want to win games as a support player, Rell is the champion to play.
Item build
Just like most engage supports, Rell wants to lock down the targets she focuses and not give them the chance to get away. Therefore, the best keystone rune for her is Glacial Augment since it applies a slow when immobilizing enemies and reduces the damage taken from your allies. It’s an effective rune that can be used at all stages of the game.
For the remaining minor runes from the Inspiration tree, you want to go for Hextech Flashtraption, Minion Dematerializer, and Cosmic Insight. Hextech Flash is an important spell for Rell, given that she can set up surprising engages. Minion Dematerializer, on the other hand, is important to secure cannon minions and it gives Rell some agency during the laning phase. The secondary tree choice should always be Resolve with Font of Life and Unflinching. The former grants extra healing to allies while Unflinching gives additional Tenacity to Rell during skirmishes.
Build-wise, Rell goes for Evenshroud as her Mythic item, followed by Knight’s Vow and Zeke’s Herald. This trio of core items boosts increases the damage of her allies and it allows Rell to redirect part of the damage taken from the allies to herself. Round off the build with Thornmail, Force of Nature, and Vigilant Wardstone.
Ability priority
When playing Rell, your ability priority is R>W>E>Q. W, Ferromancy: Crash Down, is Rell’s main engage ability so max it first. Since Q, Shattering Strike, doesn’t offer that much damage and is only used to destroy shields, max it last.
Game plan
Rell offers a strong two-vs-two so it’s important to take advantage of it. Try to get level two before the opponents and get an aggressive trade as soon as you hit it. Be careful to not get poked and lose health: You need to be able to tank damage during ganks and skirmishes.
Use Rell’s roaming ability to help the allies on the map, especially if you’re not able to find engage opportunities in the laning phase. In the later stages of the game, group with the team and use the fog of war to find picks and engages onto the enemy team. Rell has a lot of crowd controls so use them to peel the allies when necessary.
Rakan
Pros
- One of the most mobile engage supports
- Lots of crowd control
- Strong two-vs-two trading
Cons
- Squishier compared to other supports
- Requires coordination with allies to maximize combos
- Dependent on bot lane partner
Rakan was yet another champion that got buffed in recent buffs. While the buffs didn’t seem that big, he has been finding great success, boasting the highest win rate among all supports (according to U.GG).
While he doesn’t have the same numbers as Annie did when she was buffed in Patch 13.3, Rakan is one of the strongest champions currently.
Item build
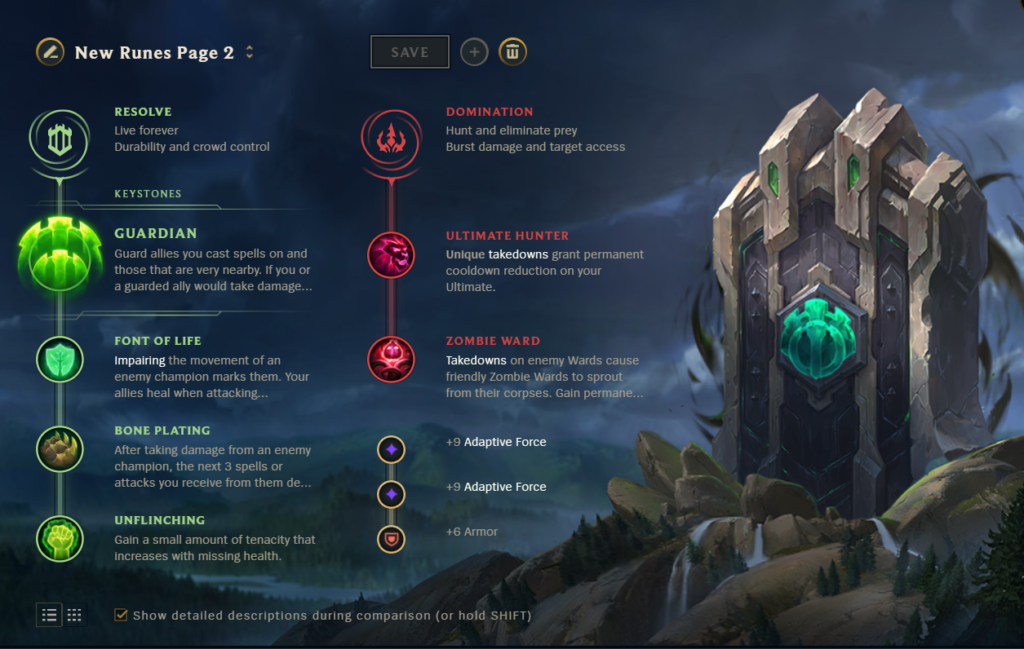
In a meta full of Summon Aery or Glacial Augment, Rakan brings some fresh air when it comes to the rune choices. His keystone rune is Guardian, which grants extra shielding to its nearby allies. It works great with his swift in-and-out kit and is a strong rune for early-game trading.
For the secondary tree, you always want to go for Domination with Ultimate Hunter and Zombie Ward. Rakan is heavily reliant on his ultimate to get strong engages, so having it ready as soon as possible is always nice. Zombie ward, on the other hand, provides extra vision when clearing enemy wards, increasing the overall vision control of your team.
Build-wise, Rakan is a heavy Shurelya’s Battlesong user. It’s the main Mythic item that he has been building ever since the item reworks: the movement speed bonus synergizes perfectly with his own kit, further increasing the distance he can travel with his combos and ultimate.
After that, you want to get Redemption for the active effect, but more importantly the extra healing and shield power. While you usually wouldn’t get past three items, you round off the build with Watchful Wardstone, Knight’s Vow, and Chemtech Putrifier. If the enemy has plenty of sustain and healing, you can consider rushing Oblivion Orb early to get access to antiheal.
Ability priority
Rakan should go for R>W>E>Q. His Grand Entrance (W) is the main damaging spell, as well as potential engage or disengage. After that, you want to max Battle Dance (E) for increasing shields. Since maxing Gleaming Quill is the least reliable spell to hit and its cooldown got lowered early on, it’s not necessary to max it until later.
Game plan
Rakan offers stronger early-game trading thanks to his mobility and shields he provides. With that in mind, you can consider fighting aggressively early on. As soon as you see the opponent overstepping, get a quick engage and let your bot lane partner follow up with the damage. Dash around using your Battle Dance (E) to draw some distance or dodge potential spells. If you’re able to do this consistently, you can look to get some takedowns. You can coordinate turret dives or ganks, especially when you unlock your ultimate.
Just like most supports that have great engage tools, you can also look to roam around the map. Given his mobility, it’s much easier to execute roam ganks with him.
In the late-game teamfights, your main goal will be to dash in and taunt as many targets as possible. It’s quite easy to do when you have Flash ready since you can go in from afar and surprise the enemies. Once you do that, your job is basically done. Your teammates should be able to do the rest.